
Are you tired of digging through piles of paper and rummaging through drawers to find your scrapbooking tools? Look no further! In this article, you will discover practical tips and storage solutions to efficiently organize your scrapbooking toolkit. Say goodbye to the frustration of misplaced items and hello to a neat and clutter-free crafting space. With these ideas, your tools will be easily accessible, allowing you to focus on what you love most, creating beautiful scrapbook pages. So, let’s get started and bring some order to your crafting world!


1. Decluttering and Sorting
1.1 Clearing out unnecessary items
Before you can begin organizing your scrapbooking tools, it’s important to declutter and clear out any unnecessary items. Take a look at your collection and determine which tools and supplies you actually use on a regular basis. Any items that you haven’t used in a long time or no longer serve a purpose should be set aside to be donated or discarded. By getting rid of the excess, you’ll create more space for the tools that you truly need and use.
1.2 Sorting tools by category
Once you have cleared out unnecessary items, it’s time to sort your tools by category. This will make it easier for you to find specific items when you need them. Some common categories for scrapbooking tools include cutting tools, adhesive tools, drawing tools, and embellishment tools. As you sort your tools, consider the frequency of use for each item. Tools that you use more often should be placed in easily accessible locations, while those that you use less frequently can be stored in a less accessible area.
1.3 Creating a designated workspace
To maintain an organized crafting space, it’s important to designate a specific area for your scrapbooking activities. Whether it’s a dedicated room or a corner of a room, having a designated workspace will help you stay focused and keep your tools and supplies in one place. Make sure your workspace is well-lit and comfortable, with enough room to spread out and work on your projects. By having a designated space, you’ll be less likely to spread your supplies all over the house and more likely to keep things organized.
2. Essential Storage Solutions
2.1 Utilizing clear storage containers
Clear storage containers are a must-have for any scrapbooking enthusiast. They allow you to see what’s inside without having to open each container, making it easier to find and retrieve specific tools or supplies. Consider investing in a set of clear plastic bins or boxes that are stackable, so you can maximize your storage space. Label each container with its contents or use clear adhesive pockets to hold labels. This will help you quickly identify which container holds the tools or supplies you need.
2.2 Investing in a scrapbooking toolbox
A scrapbooking toolbox is a valuable storage solution for keeping your most commonly used tools organized and easily accessible. Look for a toolbox specifically designed for scrapbooking, with compartments and pockets that can hold different types of tools. Choose a toolbox with a handle, so you can easily carry it to your designated workspace or take it with you to crafting events. Having a dedicated toolbox for your essential tools will save you time and frustration, as you won’t have to search through various drawers or containers to find what you need.
2.3 Using pegboards or wall-mounted organizers
Pegboards or wall-mounted organizers are practical storage solutions that can help maximize vertical space in your crafting area. Install a pegboard on a wall within arm’s reach of your workspace and hang your most frequently used tools for easy access. You can also use hooks, baskets, or shelves to keep other supplies organized and within reach. Wall-mounted organizers are not only functional, but they can also serve as decorative elements in your crafting space. Choose a pegboard or wall organizer that complements your overall decor and adds a touch of aesthetic appeal to your workspace.
2.4 Maximizing drawer space with dividers
If your workspace includes drawers, make the most of this storage option by using dividers to organize your tools and supplies. Dividers create separate compartments within a drawer, allowing you to sort and categorize items easily. For example, you can use dividers to keep different types of adhesives separate from each other, or to store scissors and cutting tools separately. Additionally, drawer dividers prevent items from shifting or sliding around, keeping your tools neat and easily accessible. Consider using adjustable dividers, so you can customize the layout of each drawer to suit your specific needs.

3. Labeling and Categorizing
3.1 Labeling storage containers and shelves
Labeling is an essential step in maintaining an organized crafting space. It helps you quickly identify the contents of storage containers and shelves, saving you time and effort when searching for specific tools or supplies. Use adhesive labels or label maker to mark each storage container or shelf with the corresponding category or item name. For example, you can label a container “Cutting Tools” or a shelf “Embellishments.” Make sure to place the labels in a visible location, such as the front or top of each container or shelf, for easy reference.
3.2 Creating a color-coded system
A color-coded system is a useful organizational technique that can help you quickly locate specific tools or supplies. Assign a specific color to each category or type of tool and use that color consistently throughout your crafting area. For example, you can use blue for cutting tools, green for adhesive tools, and yellow for drawing tools. Use colored stickers or labels to mark containers, shelves, or individual tools. This visual system will make it easy for you to spot the tools you need at a glance, saving you time and effort in searching for them.
3.3 Organizing by project or theme
Another effective way to organize your scrapbooking tools is to sort them by project or theme. If you often work on specific types of projects, such as travel scrapbooks or baby albums, keep the tools and supplies related to each project together. Label containers or shelves with the project or theme name to quickly locate the tools and supplies you need for each project. This organization method not only helps with keeping your tools organized, but it also inspires creativity by allowing you to easily access the materials for a particular project.
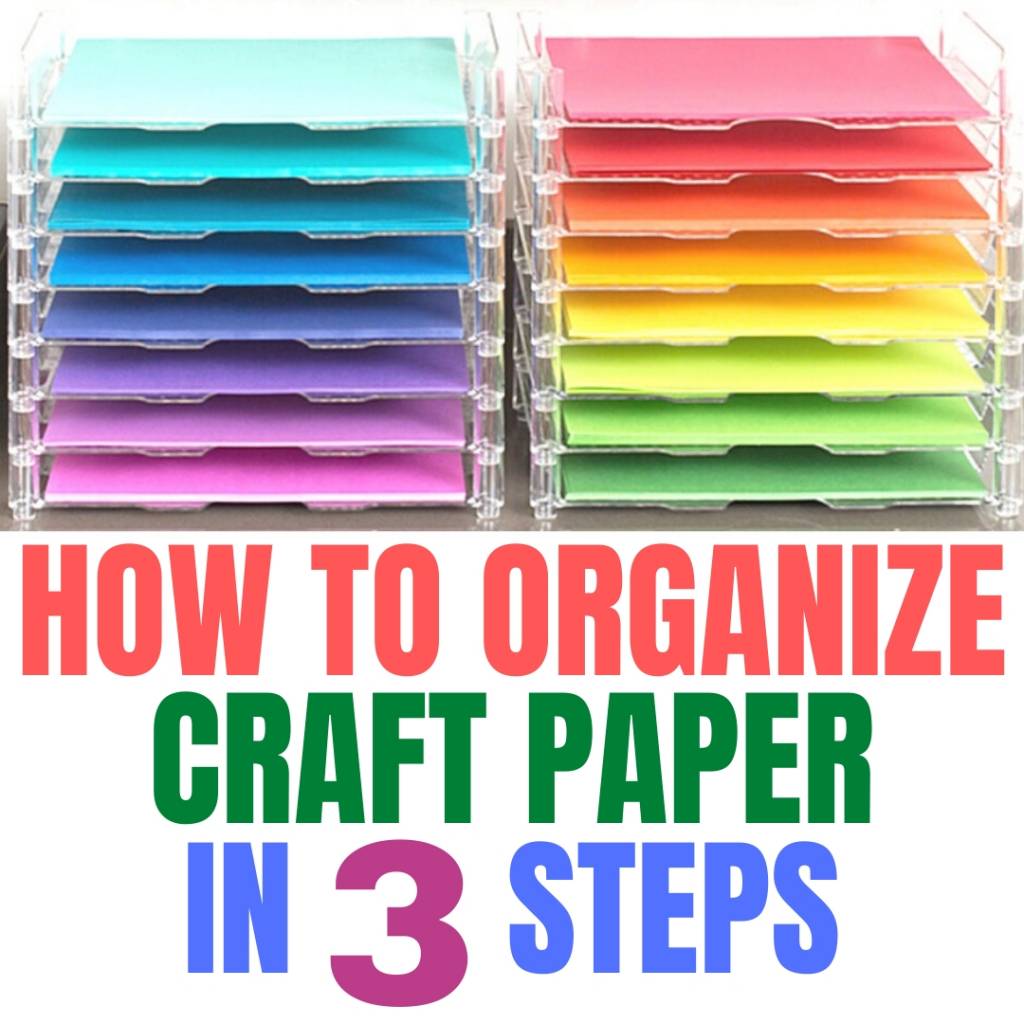
4. Efficiently Storing Paper and Cardstock
4.1 Utilizing file folders or magazine holders
Paper and cardstock can be bulky and hard to store, but there are storage solutions that can help you keep them organized and prevent damage. Consider using file folders or magazine holders to store and categorize your paper and cardstock. Label each folder or holder with the specific type or color of paper, such as “Patterned Paper” or “Cardstock – Blue.” This will make it easier for you to find the exact paper you need for your scrapbooking projects without having to sift through stacks of disorganized paper.
4.2 Sorting paper by color, size, or pattern
To further streamline the storage and organization of your paper and cardstock, sort them by color, size, or pattern. This will make it easier for you to locate the specific paper you need for a particular project. Store papers of similar colors or patterns together, or separate them by size, such as 12×12 inches or 8.5×11 inches. Use dividers or labeled folders within your paper storage system to keep different categories separated. By sorting your paper in a logical and consistent manner, you’ll save time and ensure that you always have the right paper for your scrapbooking projects.
4.3 Using vertical storage options
To maximize the use of space in your crafting area, consider utilizing vertical storage options for your paper and cardstock. Wall-mounted paper holders or racks are a great way to keep your paper organized and easily accessible. These holders typically have slots that can accommodate different sizes of paper, allowing you to sort and store them vertically. If you prefer a portable option, invest in a vertical paper organizer with multiple compartments or drawers. These compact organizers can be placed on a table or shelf, and they provide convenient storage for your paper and cardstock while keeping them within arm’s reach.

5. Storing Embellishments and Small Items
5.1 Using clear pouches or binders for small embellishments
Small embellishments, such as rhinestones, sequins, and stickers, can easily get lost or misplaced if not properly stored. To keep these items organized and easily accessible, consider using clear pouches or binders with plastic pockets. Place each type of embellishment in a separate pouch or pocket and label them accordingly. Clear pouches and binders allow you to see the contents at a glance, making it easy for you to find and retrieve specific embellishments for your projects. Additionally, you can store multiple pouches or binders in a larger container for added convenience.
5.2 Organizing buttons, brads, and eyelets in separate compartments
Buttons, brads, and eyelets are popular embellishments in scrapbooking, but they can quickly become a jumbled mess if not properly organized. Invest in a storage container with multiple compartments or small jars with screw-on lids to keep these small items separate and well-organized. Sort buttons by color or size, and store them in individual compartments or jars. Similarly, keep brads and eyelets in separate compartments to prevent them from mixing together. Use labels or clear adhesive pockets to identify the contents of each compartment or jar, making it easy to find and select the right embellishments for your projects.
5.3 Storing ribbons and threads on spools or cards
Ribbons and threads add a beautiful touch to scrapbooking projects, but keeping them from tangling can be a challenge. To prevent tangles and keep your ribbons and threads organized, consider storing them on spools or cards. Wind each ribbon or thread tightly around a small spool or cardboard card and secure the ends. Place the spools or cards in a storage container or on a pegboard with hooks. You can easily pull out the length of ribbon or thread you need without fussing with tangles. Additionally, storing them on spools or cards keeps them neat and easy to locate, adding to the overall efficiency of your crafting space.
6. Organizing Scrapbooking Tools
6.1 Holding tools in a rotating caddy
A rotating caddy is a practical and efficient way to store your frequently used tools. These caddies have multiple compartments and spin 360 degrees, allowing you to easily access your tools and supplies. Sort your tools by category and place them in the appropriate compartment of the caddy. For example, keep your scissors in one compartment, adhesive tools in another, and cutting tools in another. This setup allows you to find the tool you need with just a simple turn of the caddy. The compact size of the caddy makes it easy to transport if you like to craft in different locations.
6.2 Installing a magnetic strip for metal tools
Metal scrapbooking tools, such as paper punches or die cuts, can be stored and organized using a magnetic strip. Install a magnetic strip on a wall or the side of a cabinet within reach of your workspace. Attach your metal tools directly to the magnetic strip, ensuring a secure and easily accessible storage solution. By utilizing a magnetic strip, you’ll free up drawer space and keep your metal tools visible, making it easy to grab the right tool without rummaging through containers or drawers. This storage method also helps to keep your metal tools in good condition by preventing them from getting scratched or damaged.
6.3 Using a toolbox or tackle box for portable organization
If you often craft on the go or attend crafting events, a toolbox or tackle box can be an excellent portable storage solution for your scrapbooking tools. These containers typically have multiple compartments or trays that can be customized to fit your specific tools. Sort your tools by category or frequency of use and place them in the designated compartments or trays. The handle and secure closures of a toolbox or tackle box make it easy to transport your tools safely, and you can even customize the exterior of the box with stickers or labels to personalize it. Having a portable organization system ensures that your tools are readily available wherever your crafting adventures take you.

7. Displaying and Showcasing Completed Projects
7.1 Using wall-mounted frames or shelves
Why keep your completed scrapbooking projects hidden away when you can proudly display them for all to see? Consider using wall-mounted frames or shelves to showcase your favorite creations. Choose frames in various sizes and styles that complement the aesthetic of your crafting space or the theme of your projects. Carefully mount your completed scrapbook pages or layouts inside the frames, and hang them on the wall to create a beautiful and eye-catching display. Alternatively, you can use wall-mounted shelves to arrange your completed projects in an organized and visually appealing manner. Displaying your completed projects not only adds a personal touch to your crafting space but also serves as a source of inspiration for future projects.
7.2 Creating a scrapbook album library
If you enjoy creating multiple scrapbooks or albums, having a dedicated scrapbook album library can help you keep them organized and easily accessible. Utilize a bookshelf or dedicated storage area to house your albums, sorting them by theme or chronological order. Label each album spine with a brief description or title to quickly identify the content. Having a scrapbook album library not only keeps your completed projects organized but also allows you to revisit and enjoy your memories whenever you want. It also provides an opportunity to show off your creativity and share your scrapbooking journey with others.
7.3 Incorporating display hooks or wire grids
For those who prefer a more flexible and interchangeable way of displaying their completed projects, consider incorporating display hooks or wire grids into your crafting space. Install hooks on a wall or use a wire grid system to hang and display your completed scrapbook pages, layouts, or mini albums. The advantage of this display method is that you can easily switch out projects and update the display as you create new ones. Experiment with different layouts and arrangements to create an ever-changing and visually engaging display. By incorporating display hooks or wire grids, you can showcase your creativity and inspire others with your scrapbooking projects.
8. Tips for Maintaining Organized Spaces
8.1 Putting tools back in their designated spots after each use
One of the most important habits to maintain an organized crafting space is to put your tools back in their designated spots after each use. Resist the temptation to leave tools lying around or piled up on your workspace. By immediately returning each tool to its assigned storage location, you’ll prevent clutter from building up and ensure that everything is easily accessible the next time you need it. This simple habit will save you time and frustration in the long run, as you won’t have to search for misplaced tools or deal with a messy workspace.
8.2 Regularly decluttering and reorganizing
As you continue to engage in scrapbooking and craft activities, it’s essential to regularly declutter and reorganize your space. Set aside dedicated time every few months to assess your tools and supplies and determine if there are any items that can be donated, discarded, or relocated. Take the opportunity to reevaluate your organizational systems and make any necessary adjustments. By regularly decluttering and reorganizing, you’ll prevent your crafting space from becoming overwhelmed with unnecessary items and ensure that your tools and supplies are always well-organized and efficient to use.
8.3 Creating a cleaning schedule for the craft area
In addition to decluttering and reorganizing, it’s important to keep your crafting area clean and tidy. Develop a cleaning schedule that works for you, whether it’s a weekly deep clean or a monthly refresh. This schedule should include tasks such as dusting surfaces, wiping down tools and equipment, and vacuuming or sweeping the floors. By maintaining a clean and organized crafting space, you’ll create a more pleasant and enjoyable environment for your creative pursuits. Additionally, a clean space can contribute to improved focus and productivity.

9. Inspiration for Creative Organization
9.1 Exploring online resources and blogs
There is a wealth of information and inspiration available online for creative organization. Explore websites, blogs, and social media platforms dedicated to scrapbooking and crafting organization. You’ll find tips, tricks, and ideas shared by fellow crafters who have perfected their organization systems. Take the time to browse through these resources, saving or bookmarking helpful articles or images that resonate with you. Use this inspiration to incorporate new ideas into your own crafting space, adapting them to suit your personal style and needs.
9.2 Attending craft storage and organization workshops or events
If you prefer a hands-on approach to learning and gathering inspiration, consider attending craft storage and organization workshops or events. These gatherings bring together like-minded individuals who share their knowledge and experiences in organizing crafting spaces. Workshops often include demonstrations of various organization systems and techniques, as well as opportunities for participants to ask questions and seek personalized advice. Attending these workshops can provide valuable insights and practical solutions that you can apply to your own scrapbooking toolkit organization.
9.3 Joining scrapbooking communities for ideas and tips
Being part of a scrapbooking community is an excellent way to connect with other crafters and exchange ideas and tips for organizing your tools and supplies. Join online forums or social media groups dedicated to scrapbooking and crafting organization. Engage in conversations, ask questions, and share your own experiences. By becoming an active member of a scrapbooking community, you’ll have access to a vast pool of knowledge and expertise that can help you tackle any organizational challenges you may encounter. You’ll also find support and motivation to maintain an efficiently organized crafting space.
10. Conclusion
10.1 Recap of key organization strategies
Efficiently organizing your scrapbooking tools and supplies is essential for maintaining a neat and efficient crafting space. By following these key organization strategies, including decluttering, utilizing storage solutions, labeling and categorizing, and implementing creative organization ideas, you can create a functional and inspiring workspace.
10.2 Importance of maintaining an efficient crafting space
Maintaining an organized crafting space is not just about aesthetics; it also plays a crucial role in your productivity and creativity. An efficiently organized space allows you to quickly find the tools and supplies you need, reduces the time spent searching for items, and promotes a sense of calm and focus. By investing time and effort into organizing your scrapbooking toolkit, you’ll create an environment that nurtures your creativity and enhances your overall crafting experience. So, take the first step towards an efficiently organized crafting space and enjoy the benefits it brings to your scrapbooking journey.